Learn Geek languages like Big data,Hadoop,Hive,Pig,Sqoop ,flume,Cassandra,Hbase,Ruby On Rails,Python,Java and many more.

Thursday 30 November 2017


                                how to write Pig UDF example in JAVA

What is Pig UDF?
Pig having some Built-in functions, we can use that Built-in functions for our Pig Script without adding any extra code but sometimes user requirement is not available in that built-in functions at that time user can write some own custom user-defined functions called UDF (user defined function).Here is the simple steps of How To Write Pig UDF Example In Java.

Steps to create Pig UDF
Step 1:-
Open your Eclipse and Create a Java Class Name like first.java
Step 2:-
You should add jar files to that Project folder like
Right Click on project —> Build Path —> Configure Build Path —> Libraries —> Add External Jars —> Select Hadoop and Pig Lib folder Jars files and Add other Jars files In Hadoop folder —–> Click Ok.
Step 3:-
Now your Pig java program is supported in your eclipse without any errors.The basic step in Pig UDF is
public class first extends EvalFunc<Class DataType> and you return the value.
----------------------------------------CODE:----------------------------------------------
package mypro;

import java.io.IOException;
import org.apache.pig.EvalFunc;
import org.apache.pig.data.Tuple;
import org.apache.pig.impl.util.WrappedIOException;

public class Ucfirst extends EvalFunc<String> {
    public String exec(Tuple input) throws IOException {
        if (input.size() == 0)
            return null;
        try {
            String str = (String) input.get(0);
            char ch = str.toUpperCase().charAt(0);
            String str1 = String.valueOf(ch);
            return str1;

        } catch (Exception e) {
        
            throw WrappedIOException.wrap(
                    "Caught exception processing input row ", e);
        }
    }
}
-----------------------------------------------------------------------------------------------------------
Step 4:-
public String exec(Tuple input) throws IOException {
if (input.size() == 0)
return null;
Class Name String and The entire row in the text file is considered as Tuple and first of all, it will check the input is zero or not if the input is zero then it returns null.
Step 5 :-
Try Catch Block,we have to write the logic in Try Block
try {
String str = (String) input.get(0);
char ch = str.toUpperCase().charAt(0);
String str1 = String.valueOf(ch);
return str1;
Step 6 :-
Catch Block only for exception Handling
How to Execute this code In Pig UDF ?
Step 1 :-
Right click on program —> Export —> create Jar
Step 2 :-
Register Jarname;
Step 3 :-
Write The Pig Script as first.pig
REGISTER first.jar;
A = LOAD ‘sample.txt’ as (logid:chararray);
B = FOREACH A GENERATE mypro.first(logid);
DUMP B;
In the above Script mypro is Package name and first is class name
pig -x local first.pig
Output
(W)
(C)
(X)
(U)

Tuesday 24 October 2017

STEPS to change Logon Screen :-


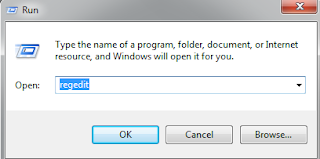
1-Open up your run command. (Fastest way to do is to do 'Windows Key' + r)

2-Type in regedit.


3-Find HKEY_LOCAL_MACHINE > Software> Microsoft > Windows >
   CurrentVersion > Authentication > LogonUI > Background
   Double-click on OEMBackground


4-Change this value to 1. 

5- Click Okay and close out of regedit.

6-Open up Windows Explorer or My Computer and navigate to your
Windows directory.

7-In your system32 folder in your windows directory, you'll need to create a couple new folders. For the standard user,  go to c:\windows\system32\oobe and create a folder labeled info.
 Inside the info folder, make another folder called backgrounds.

8-Your final path should look like
 c:\windows\system32\oobe\info\backgrounds

9-Place your image in this folder. Your file must be labeled backgroundDefault.jpg

Friday 22 September 2017

STEP 1:  install Pygame library
-----------
$ sudo apt-get install python-pygame


STEP 2 : code of snake game save with .py extension
-----------


# snake game in python

import pygame, sys, time, random

# check for initialising error
check_error = pygame.init()
if check_error[1] > 0:
    print("(!) Had {0} initializing errors, exiting...".format(check_error[1]))
    sys.exit(-1)
else:
    print("(+) PyGame successfully initialized")

# Play Surface
playSurface = pygame.display.set_mode((720, 460))
pygame.display.set_caption('Snake Game ----:>')
#time.sleep(5)

# Colors
red = pygame.Color(255,0,0)#gameOver
green = pygame.Color(0,255,0)#Snake
black = pygame.Color(0,0,0)#Score
white = pygame.Color(255,255,255)#background
brown = pygame.Color(162,42,42)#food

# FPS Controller
fpsController = pygame.time.Clock()

# Important Variables
snakePos = [100,200]
snakeBody = [[100,50],[90,50],[80,50]] #,[70,50],[60,50],[50,50],[40,50],[30,50],[20,50]

foodPos = [random.randrange(1,72)*10, random.randrange(1,46)*10]
foodSpawn = True

direction = 'UP'
changeTo = direction

score = 0

#Game Over Function
def gameOver():
    myFont = pygame.font.SysFont('monaco', 72)
    GOsurf = myFont.render('Game Over!', True, red)
    GOrect = GOsurf.get_rect()
    GOrect.midtop = (360,15)
    playSurface.blit(GOsurf, GOrect)
    showScore(0)
    pygame.display.flip()
    time.sleep(2)
    pygame.quit()
    sys.exit()

# score function
def showScore(choice=1):
    sFont = pygame.font.SysFont('monaco', 24)
    Ssurf = sFont.render('Score : {0}'.format(score), True, black)
    Srect = Ssurf.get_rect()
    if choice ==1:
        Srect.midtop = (80, 10)
    else:
        Srect.midtop = (360, 150)

    playSurface.blit(Ssurf, Srect)

#Main Logic Of Game
while True:
    for event in pygame.event.get():
        if event.type == pygame.QUIT:
            pygame.quit()
            sys.exit()
        elif event.type == pygame.KEYDOWN:
            if event.key == pygame.K_RIGHT or event.key == ord('d'):
                changeTo = 'RIGHT'
            if event.key == pygame.K_LEFT or event.key == ord('a'):
                changeTo = 'LEFT'
            if event.key == pygame.K_UP or event.key == ord('w'):
                changeTo = 'UP'
            if event.key == pygame.K_DOWN or event.key == ord('s'):
                changeTo = 'DOWN'
            if event.key == pygame.K_ESCAPE:
                pygame.event.post(pygame.event.Event(pygame.QUIT))

    # Validation of direction
    if changeTo == 'RIGHT' and not direction == 'LEFT':
        direction = 'RIGHT'
    if changeTo == 'LEFT' and not direction == 'RIGHT':
        direction = 'LEFT'
    if changeTo == 'UP' and not direction == 'DOWN':
        direction = 'UP'
    if changeTo == 'DOWN' and not direction == 'UP':
        direction = 'DOWN'

    if direction == 'RIGHT':
        snakePos[0] += 10
    if direction == 'LEFT':
        snakePos[0] -= 10
    if direction == 'UP':
        snakePos[1] -= 10
    if direction == 'DOWN':
        snakePos[1] += 10

    # snake bodyh mechanism
    snakeBody.insert(0, list(snakePos))
    if snakePos[0] == foodPos[0] and snakePos[1] == foodPos[1]:
        score+=10
        foodSpawn = False
    else:
        snakeBody.pop()

    if foodSpawn == False:
        foodPos = [random.randrange(1, 72) * 10, random.randrange(1, 46) * 10]
    foodSpawn = True

    playSurface.fill(black)
    for pos in snakeBody:
        pygame.draw.rect(playSurface,green,pygame.Rect(pos[0], pos[1],10,10))

    pygame.draw.rect(playSurface, brown, pygame.Rect(foodPos[0], foodPos[1], 10, 10))

    if snakePos[0] > 710 or snakePos[0] < 0:
        gameOver()
    if snakePos[1] > 450 or snakePos[1] < 0:
        gameOver()

    for block in snakeBody[1:]:
        if snakePos[0] == block[0] and snakePos[1] == block[1]:
            gameOver()

    showScore()
    pygame.display.flip()
    fpsController.tick(20)

Thursday 21 September 2017


Download JAR file and Dll files :

http://rxtx.qbang.org/wiki/index.php/Download

Code for USB comm.

//www.geeklanguages.blogspot.com
import gnu.io.CommPort;
import gnu.io.CommPortIdentifier;
import gnu.io.SerialPort;
import java.io.FileDescriptor;
import java.io.IOException;
import java.io.InputStream;
import java.io.OutputStream;
//geeklanguages
public class TwoWaySerialComm
{
    public TwoWaySerialComm()
    {
        super();
    }
   
    void connect ( String portName ) throws Exception
    {
        CommPortIdentifier portIdentifier = CommPortIdentifier.getPortIdentifier(portName);
        if ( portIdentifier.isCurrentlyOwned() )
        {
            System.out.println("Error: Port is currently in use");
        }
        else
        {
            CommPort commPort = portIdentifier.open(this.getClass().getName(),2000);
           
            if ( commPort instanceof SerialPort )
            {
                SerialPort serialPort = (SerialPort) commPort;
                serialPort.setSerialPortParams(9600 ,SerialPort.DATABITS_8,SerialPort.STOPBITS_1,SerialPort.PARITY_NONE);
               
                InputStream in = serialPort.getInputStream();
                OutputStream out = serialPort.getOutputStream();
               
                (new Thread(new SerialReader(in))).start();
                (new Thread(new SerialWriter(out))).start();

            }
            else
            {
                System.out.println("Error: Only serial ports are handled by this example.");
            }
        }   
    }
   
    /** */
    public static class SerialReader implements Runnable
    {
        InputStream in;
       
        public SerialReader ( InputStream in )
        {
            this.in = in;
        }
       
        public void run ()
        {
            byte[] buffer = new byte[1024];
            int len = -1;
            try
            {
                while ( ( len = this.in.read(buffer)) > -1 )
                {
                    System.out.print(new String(buffer,0,len));
                }
            }
            catch ( IOException e )
            {
                e.printStackTrace();
            }           
        }
    }

    /** */
    public static class SerialWriter implements Runnable
    {
        OutputStream out;
       
        public SerialWriter ( OutputStream out )
        {
            this.out = out;
        }
       
        public void run ()
        {
            try
            {               
                int c = 0;
                while ( ( c = System.in.read()) > -1 )
                {
                    this.out.write(c);
                }               
            }
            catch ( IOException e )
            {
                e.printStackTrace();
            }           
        }
    }
   
    public static void main ( String[] args )
    {
        try
        {
            (new TwoWaySerialComm()).connect("COM4");
        }
        catch ( Exception e )
        {
            // TODO Auto-generated catch block
            e.printStackTrace();
        }
    }
}
//geeklanguages


Thursday 7 September 2017


Steps to install Apache Flume.


Step 1 : Download the Latest Version of Flume. 

Step 2 : tar –xzvf apache-flume-1.5.2-bin.tar.gz

Step 3 :
make a flume name folder in usr/local/

$sudo mkdir /usr/local/flume
then
$ sudo mv apache-flume-1.5.2-bin  /usr/local/flume

Step 4 : sudo gedit .bashrc


paste these below lines in bashrc file at last

Step 5 :
export FLUME_HOME=/usr/local/flume
export FLUME_CONF_DIR=$FLUME_HOME/conf
export FLUME_CLASS_PATH=$FLUME_CONF_DIR
export PATH=$FLUME_HOME/bin:$PATH

Step 6

$ cd /usr/local/flume/apache-flume-1.5.2-bin

$ sudo cp conf/flume-env.sh.template conf/flume-env.sh

Step 7

$ sudo gedit conf/flume-env.sh

 do these changes

JAVA_HOME=/usr/lib/jvm/jdk1.8.0    (must check ur java version)

uncomment this line

JAVA_OPTS="-Xms100m -Xmx200m -Dcom.sun.management.jmxremote"

Step 8

$ sudo cp flume-conf.properties.template  flume-conf.properties

 do these changes..

agent.channels.memoryChannel.type = memory
agent.channels.memoryChannel.capacity = 100


Video for installation of flume


Tuesday 27 June 2017

dfsadmin tool provide the commands to handle the safe mode.

The commands are-

1. hdfs dfsadmin -safemode get

This command will show if the name node is in safe mode or not
Output will be

Safe mode is ON (if namenode is in safe mode)
Safe mode is OFF (if namenode is not in safe mode)

2 .hdfs dfsadmin -safemode enter

 This command will take the namenode into the safe mode
 Output will be  -

 Safe mode is ON

3.hdfs dfsadmin -safemode leave

This command will force the namenode to come out of safe mode. It will be better if nameode is allowed to come out of safe mode itself.
Output will be -

Safe mode is OFF

Friday 23 June 2017


CODE

#include <iostream>
using namespace std;

int addition (int a, int b)
{
  int r;
  r=a+b;
  return r;
}

int main ()
{
  int z;
  z = addition (5,3);
  cout << "The result is " << z;
}


Output:

The result is 8

CODE:

#include <iostream>
using namespace std;

void printmessage ()
{
  cout << "I'm a function!";
}

int main ()
{
  printmessage ();
}

Output:

I'm a Function!